In this article, we will learn how we can Plot a drawing at Scale in AutoCAD. We will learn how to set up your drawing inside the Layout workspace and how to use the Page setup manager and we will also learn correct settings for plotting drawings for final PDF conversion or Printing on paper.
Table of Contents
Here are all the steps to plot a drawing at scale in AutoCAD.
- Setting Up Your Drawing
- Layout Setup
- Page Setup Manager
- Adding a New page setup
- Modifying page setup
- Plot settings
- Create a Viewport
- Preview feature
- Plotting the drawing
Step 1: Setting up your Drawing
Make sure your drawing is on the correct scale, you can verify your drawing scale by verifying any one of the dimensions inside your drawing, Check out the attached image below to get an idea to verify the scale of the drawing.

If the drawing is not scaled properly, Use the “SCALE” command inside the model workspace and adjust the scale of the drawing.
Step 2: Layout Setup
AutoCAD has two different spaces:
- Model space
- Layout space also known as Paper space
Model space: Inside the Model space we can create actual designs and draw different 2D and 3D models, it’s like an infinite workspace where we can create drawings as large as needed, here you can work in real-world units and will able to draw objects to scale.
Inside model space, we can also utilize the “LAYER” tool to optimize drawings by assigning different properties and visibility to different layers associated with different objects.
Paper space: Paper space is primarily used for printing or Plotting drawings. Inside the paper space, you can define the scale of the drawing with multiple viewports to show different views of your model at different scales.
Inside the paper space, you can also include a Title Block, Annotations, Dimensions, etc.
We can define different printers and plotter settings for different paper sizes, orientations, and plot styles.

Now we have an idea about Model space and layout space, let’s set up the Layout.
To switch between Layout space and Model space we can left-click on the tabs at the left bottom corner of the AutoCAD interface, checkout this image below.

Once you switch to Layout/paper space from model space, the first thing I always recommend is to Rename your Layout space by Right-clicking on the Layout tab and activating the rename option.

The moment you rename your layout space the next step will be to Delete or Erase any viewport from the paper space.
To Delete viewports inside the layout space just press the CTRL+A keys to select everything and then press the DELETE key, or else right-click and activate the ERASE command. This will erase all unnecessary viewports inside paper space.

Step 3: Page Setup Manager
Since we got our Paper space empty now we are ready to do page setup.
Active “Page Setup Manager” panel, this can be done using two methods.
Method 1: Right-click on the “Layout” in the Left-Bottom corner of AutoCAD and select the option “Page Setup Manager.

Method 2: Page setup Manager can also be activated using the shortcut command “PAGE SETUP” in the command panel.

Step 4: Adding a New page setup
The moment you activate the “PAGE SETUP” command Page Setup Manager panel will pop up.
Inside the Page setup Manger we had options to Start with a New Setup or Modify the existing one.
For this article we will go with New Setup, Just click on “New” inside the page setup manager and again a new panel will pop up for New Page Setup, Just write a New page setup name and then Click “OK“.

Step: 5 Modifying page setup
Now if you would like to modify page setups at any point in time just repeat the same process as in STEP 3 and instead of starting to new setup just click on Modify by selecting the already existing page setups.

Step: 6 Plot Settings
The moment you click OK, a new “PAGE SETUP” panel will pop up with multiple options and settings.
Now just follow the setting as per the image to plot your drawing as PDF on A3 paper, also if you want to print or plot with different settings, just explore these options.

- Printer/Plotter: Select your Printer or Plotter, if you want to create a PDF file, select as per the image above, or else select your configured printer.
- Paper size: Once you have selected the printer/plotter select the paper size as per your requirement, The most common paper sizes are A4, A3, A2, and A1.
- What to plot: Since we are setting up to plot in the Layout workspace, so will select the “Layout” option here.
- Plot style table: Plot style tables are customized plot styles for final printing or plotting, if you want to print in Black & white you can try out different plot styles.
- Plot Scale: Since we are setting up for full-scale or 1:1 scale drawing so will select the 1:1 option here.
These were the most important settings on the page setup panel, other common settings are Drawing orientation & quality can be selected as per requirements.
Once you have selected all these settings correctly, just click on the “OK” button at the bottom of the page setup panel, and then click “CLOSE” on the Page setup manager panel.
Now you have completed the Plot settings inside Page setup to Plot a Drawing at Scale in AutoCAD.

Step: 7 Create a Viewport
To create a viewport just navigate to the Layout Viewports tool panel inside the Layout Ribbon tab and Activate the Rectangular Viewport command.

Now either you can specify two corner points to select the paper space you created or else select the “Fit” option inside the command bar.
By doing so it will create a viewport where your drawings or designs from the model space will be projected.


Now just select the viewport and select the drawing or sheet scale you want to create, you need to adjust your views based on the scale you will select inside the viewport.

Inside the scale feature, you will also get an option to create custom scales like 3:2, and 4:3. You can select or create a scale that best matches your drawing.
You can also lock the viewport for any accidental changes using the lock viewport tool as indicated above.
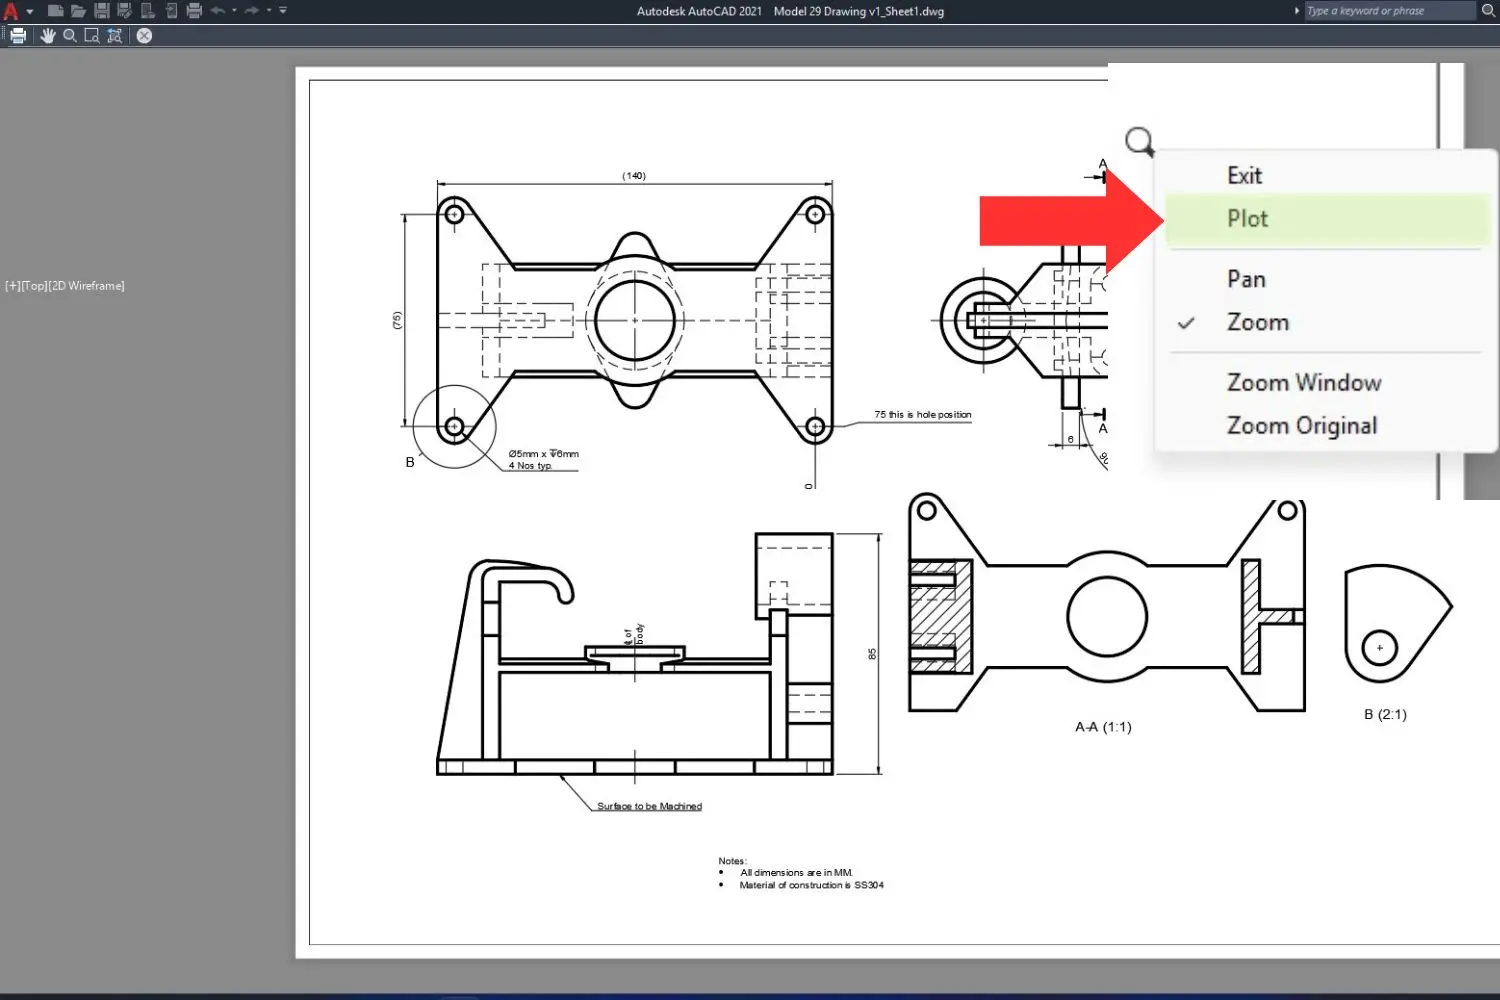
Step: 8 Preview feature
To preview your drawing, you need to activate the plot command using the “PLOT” tool or using the keyboard shortcut “CTRL+P” and click on “Preview”.
Every setting inside the plot manager is already configured based on the plot settings we had defined earlier.

Step: 9 Plotting the drawing
Once the Preview pane is active and you are satisfied with the result just make a Right-Click and click on the “Plot”.
And finally, just specify the file name and location to save your drawing.
If you follow the above steps, you can easily plot a drawing at scale in AutoCAD.
And if you have any doubts or questions regarding this topic, just comment below!
Also if you would like to learn “How to create a perfect Dynamic Block with attributes in AutoCAD” check out this complete detailed article.
Enroll in our free certification courses on AutoCAD, Fusion 360, Solidworks & 3D Printing.